Small recap
It took me three days and three takes to make 26 pictures. Now I had to shrink the pictures to a smaller size. This would lead to a faster download of the blog post and hopefully a better performance of my blog post.
Warning:
This is not the standard look-how-great-I-am blog post. It is more like look-how-I-stumbled-forward.
Reminder to myself:
As a tester I built this website to share information, but also to get a better understanding of building websites. The more I blog, the better I test.
Here, have some notes
Writing a blog post is creating an introduction, a good end, and something in between. The last part was still missing.
I only had notes and pictures in a charter. As an experienced tester I made my observations including date and time. I used the abbreviation PIC for Picture.
20201012 blogging
PIC 10:37 Screen print TEstLogin3.java
Input: Cap / Secret.
PIC 10:44 debug menu
PIC 10:46 first breakpoint.
PIC 10:47 Cap in screen.
All my pictures had names like “20201012 – 1.2 debug program.jpg”:
- “20201012” is the date when the picture was taken. The format is year in 4 digits, the month in 2 digits, and the day in 2 digits.
- “1.2” means Take 1 and Step 2.
- “debug program” describes the picture.
- “.jpg” describes how the picture is stored. I chose this file format, because it is great for editing. That is a bit of a spoiler.
The big advantage of this name is that I can order the pictures on name.
I must have looked like a Holywood director. Day 1, take 1.
Now I had to make a link between my actions and the pictures. Luckily, I had used descriptive names for the screen pictures. These pictures had a day and time stamp, so it was easy to place the file names at the right places in my blog post.
20201012 blogging
PIC 10:37 Screen print TEstLogin3.java -  20201012 - 1.1 three breakpoints.jpg
Input: Cap / Secret.
PIC 10:44 debug menu - 20201012 - 1.2 debug program.jpg
PIC 10:46 first breakpoint. - 20201012 - 1.3 - first breakpoint.jpg
PIC 10:47 Cap in screen.- 20201012 - 1.4 - fill in username.jpg
Processing a picture
A 288 kb picture is too big for my blog post. I figured out several steps to cut down the size.
Emphasizing
The first step is to determine whether a box should be placed in the picture. If this was the case, I used a green bordered and transparent rounded rectangle for highlighting.I would add “+box”:
e.g. “mindful-tester-p3-20201012 – 1.4 – fill in username+box.jpg”.
Let me break down the name again:
- “mindful-tester” is the name of my blog.
- “p3” is the third part of TDD in Test Automation.
- “20201012” is the date when the picture was taken.
- “fill in username” is the description of the picture.
- “+box” states that a rectangle is placed in the picture for highlighting an important detail.
- “.jpg” describes how the picture is stored.
In case of no box I did not add anything at the end of the name.
This would lead to:
“mindful-tester-p3-20201012 – 1.4 – fill in username+no+box.jpg”
After a while, I did not use the “+no+box” any more, because it did not add value.
I stored the old version of the file in case of any mistakes.
So far, so good.
Zooming in
The second step was that I cropped the picture: I would cut a rectangle out of the picture and save it. My favourite shareware tool is irfanview. Less pixels means smaller size and better performance.
Shrinking
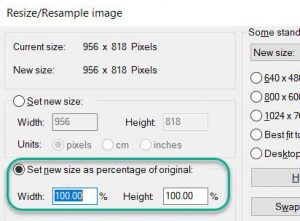
The third step was to shrink the picture also using irfanview.
This way a picture of 288 kb could be shrunk to 40 kb.
Note: for this blog post I accidentally used a png file. png is like jpg a way to store pictures. Only irfanview would not let me resize the png picture using percentages.
In WordPress I resized the picture to maximum size. I selected a corner of the picture and stretched the picture. This way the user does not have to click on the picture to see the details.
The new file name was:
“mindful-tester-p3-1.4-fill-in-username+box.jpg”.
I left out the date and the spaces in the name.
Was this a joyful experience for me? Not really.
So the time of processing pictures became longer and longer, until I forgot my process.
Processing pictures
The status of the picture was not clear in the file name. Also, the location of the pictures had its own logic. So the time between the editing of one picture and the editing of another picture became longer and longer.
So I made a nice file with all kind of instructions, “Instructions printscreens programming.txt”.
This included files, their contents, and their locations.
Exploratory blogging in a nutshell.
Only to discover that I had already “Overview files.txt” in place.
Exploratory blogging takes practice.
Because a lot of time was spent on editing the pictures, I did not remember my steps well enough while writing. Now pictures are handy, because pictures do not lie. So I had to change my story a few times.
Looking at some pictures I missed the essential point of the picture. So I added the transparent rectangle and went through the whole editing process again. Even after cropping the picture the important details were too small in some cases. So I split pictures in certain cases.
Placing a picture in a blog post is quite tiresome. I had to go to the right location, search the right picture, and upload it. Not enjoyable at all.
But I already knew what I wanted to upload. So I opened Media and uploaded all the pictures using one drag and drop.
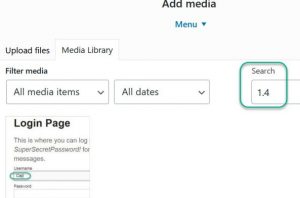
Then I searched for the first picture to be included using PIC for Picture. All my files had an unique name like
“mindful-tester-p3-1.4-fill-in-username+box.jpg”.
Using the filter I searched for the file with 1.4 in the name. Then I selected the file.

Uncomfortable observations afterwards
- At the end I shrunk the total size of my pictures in the blog post to a quarter: from 8 Mb to 2 Mb, which is still big. Is it still possible to shrink the pictures without losing the important details?
- I did not check the size of my blog post with the preview version.
- Chrome Devtools contains Lighthouse, an accessibility tool. My site scored 58 on a scale from 1 to 100 for performance. This is not really high.
- The setting of “the most number of blogs posts show on page” was still on 5. I forgot to save this setting. Saving a setting in WordPress was not consistent with saving an alternative text for picture.
- The trouble with pictures is, that it can cost a lot of time. This will decrease my enjoyability. It makes my blogging slower. On the other hand it will increase the enjoyability of the readers. At the end this will increase my enjoyability. I like to read my own blog posts. I might call this the Enjoyability Paradox. Things which I did, were no fun, but finishing the blog post was good for my mood.
Coming up
At the end of the picture processing, I had a bunch of pictures without alternative texts. For blind people or people with bad sight this had to be fixed. A screen reader needed these texts to describe the pictures aloud. This was about accessibility.

